
I’ve added a step-by-step video tutorial to make this pattern easier to follow. Watch the video below before starting your square 😊
Introduction
If you’ve ever followed a crochet pattern step by step and still ended up wondering, “Why doesn’t mine look like that?” — you’re definitely not the only one.
Floral granny squares can be especially tricky. One small detail—like tighter chains or shorter puff stitches—can completely change the final look. I’ve made this exact mistake myself more times than I’d like to admit, especially when learning lace-style patterns.
That’s exactly why I created this guide. Instead of just listing steps, I’ll walk you through this floral lace square in a way that actually makes sense, with simple explanations and practical tips along the way. Whether you’re making your first motif or planning a full project like a top or cardigan, this will help you get a result that finally looks right—and feels satisfying to finish.

Stitch Key (Simple Terms)
- mr=magic ring
- ch = chain
- sl st = slip stitch
- tr=trebal crochet

Step-by-Step Pattern (With Helpful Tips)
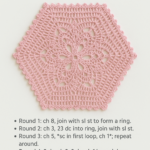
Round 1 – Center Ring
- Make a magic ring
- ch 5 (counts as tr)
- Work 15 tr into ring
- Join with sl st (16 stitches total)
👉 Tip: Don’t pull the ring too tight yet—leave a little space so your stitches can breathe and stay flat.
Round 2 – Chain Loops
- ch 6
- tr+2ch ( repeat around)
👉 You’ll get 16 loops
👉 Tip: Keep your chains slightly loose—tight chains will shrink your petals later.
Round 3 – First Petal Layer
- ch 7(count as tr) 4tr to make a patel
- after first patel (ch9 to make 1st corner)
- In each loop: (4tr+7ch)(3 times yarn over on the crochet hook
- after 4 patels make corner (total 4 corners)
👉 16 petals total
👉 Tip: Pull your tr up a bit taller than usual—this is what gives the design that soft, floral look.
Round 4 – Petal Expansion
👉 Creates larger spaces behind petals
👉 Tip: If your work starts curling here, your chains are too tight—loosen them slightly.
Round 5 – Turning Into Square
- In every 4th space (corner): (tr6,9ch,tr6,slst)
- Between corners: (7ch,slst to lower chains middle repeat it 2 time)
👉 Tip: Place stitch markers in corner spaces—it makes shaping MUCH easier.

Practical Tips (From Real Experience)
- ✔ Use cotton yarn if possible — it shows stitch detail beautifully
- ✔ If your square looks uneven, blocking will fix 80% of issues
- ✔ Beginners: use a slightly larger hook than recommended
- ✔ Count stitches at the end of each round (this saves time later!)
- ✔ Take a short break after Round 5 — that’s where mistakes usually happen
Common Mistakes (And How to Fix Them)
Square is curling
Cause: tight tension or small hook
Fix: loosen chains OR go up one hook size
Petals look flat
Cause: puff stitches too short
Fix: pull loops higher before closing puff
Square looks wavy
Cause: too many chains or loose tension
Fix: reduce chain spaces slightly
Shape is not square
Cause: misplaced corners
Fix: always mark your 4 corner spaces
Center hole too big
Cause: magic ring not tightened
Fix: gently pull tail after Round 2
❓ FAQ (Helpful & Real)
Q: Is this pattern beginner-friendly?
Yes! If you know basic stitches like dc and chain, you can follow this with patience.
Q: Can I use acrylic yarn?
You can, but cotton gives a cleaner and more defined result.
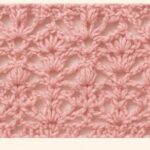
Q: Why does my square not look like the photo?
Most likely tension or puff stitch height—those two make a BIG difference.
Q: How many squares do I need for a top?
Usually 12–20 depending on size and style.

Personal Experience
When I first worked on this design, the shape didn’t come out the way I expected—especially the petals, which looked a bit lifeless. After adjusting how I formed my puff stitches, the whole piece started to look much more defined. It really showed me how much small techniques can affect the final result.
Variations & Creative Ideas
- 🌈 Use different colors for each round (great for Pinterest!)
- 🧥 Join multiple squares to make a cardigan or crop top
- 👜 Turn one square into a coaster or mini pouch
- ✨ Add beads in the center for a decorative touch
Final ThoughtsTake your time with this pattern. It’s not about speed—it’s about learning how stitches shape the design.Once you get it right, you’ll want to make a whole collection ❤️
How did you sew the squares together? What stitch did you use?
I used a slip stitch join for the squares 😊 I just placed them right sides together and slip stitched along the edges. It gives a really flat and clean finish, which works perfectly for this kind of floral pattern.
What size crochet hook do you use? Don’t see it anywhere.
I used a 2.0 mm hook + lightweight cotton yarn It gives the best clean and defined floral look.
Is there directions for putting the squares together for a sweater
I haven’t included the full sweater assembly instructions yet 😊. I joined the squares in rows and then connected the rows to form the body and sleeves. I’m thinking about creating a separate post showing the layout and assembly process.
What size is this? How can I make it bigger?
The finished size can vary depending on the yarn, hook size, and your personal tension. If you’d like to make the squares bigger, you can use a slightly larger hook, thicker yarn, or add an extra border round around the square. For a larger sweater or top, you can also add more squares to the overall design. 😊
This doesn’t seem to be the instructions for the picture. The written pattern works up to a pretty floral motif, but it is not what is pictured above.
Thank you for taking the time to leave your feedback. I appreciate you pointing this out. The written pattern was intended to recreate the design, but I understand it doesn’t match the photo exactly. I’ll review the pattern and update the post to make it more accurate. Thank you for helping improve the tutorial!
To help make everything clearer, I’ve recorded a step-by-step video showing exactly how I crochet the square
https://heartmadehabbits.com/2026/04/how-to-crochet-a-floral-lace-granny-square-step-by-step-beginner-guide-2/
Hi. Is it possible that you can send a copy of the color coded directions to me. It looks very helpful and it is hard to read on Pinterest. Also, if you do put directions for making the squares into a top or cardigan can you send the link please.
https://heartmadehabbits.com/2026/04/how-to-crochet-a-floral-lace-granny-square-step-by-step-beginner-guide-2/
Thank you for your comment.
https://heartmadehabbits.com/2026/04/how-to-crochet-a-floral-lace-granny-square-step-by-step-beginner-guide-2/
Why is there different instructions than the picture
you posted? It does match the pattern. There is only one row of puff stitches.
https://heartmadehabbits.com/2026/04/how-to-crochet-a-floral-lace-granny-square-step-by-step-beginner-guide-2/
Incomplete pattern. Does not include assembly. Very frustrating!
Thank you for your feedback, and I’m sorry the post was frustrating. This tutorial was intended to show how to make the floral granny square, but I understand many readers are also looking for the sweater assembly instructions.
I’m currently working on a step-by-step assembly video and guide to show how the squares are joined together. I’m having a little trouble getting the video uploaded at the moment, but I hope to share it as soon as I can. Thank you for your patience and for letting me know what you’d like to see.
This post is incomplete. Round 4 has no instructions, Round 5 is missing altogether. I tried to go to the links in other Reply’s but it takes me to a log-in. Either post or don’t but don’t do it half-way.
Hi Jenny, thank you for letting me know. I’ve added a step-by-step video to the post that shows how to make the square, including the missing rounds. The video is public, so you should be able to watch it directly in the post. I hope it helps! ❤️
thanks
https://heartmadehabbits.com/2026/04/how-to-crochet-a-floral-lace-granny-square-step-by-step-beginner-guide-2/
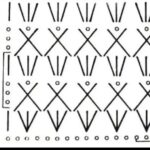
I agree with another comment-the chart is too blurry to read. Any chance we can get a better copy?
Hi Janice, thank you for your feedback! I understand the chart is difficult to read. I’ve now added a step-by-step video tutorial to the post, which should make the pattern much easier to follow. I hope it helps! ❤️
https://heartmadehabbits.com/2026/04/how-to-crochet-a-floral-lace-granny-square-step-by-step-beginner-guide-2/