If you’ve ever opened a crochet pattern and felt completely confused by all the tiny symbols and lines, you are definitely not alone. I remember staring at my first crochet chart thinking it looked more like a secret code than a pattern.
The good news is that crochet symbols are actually much easier to understand than written patterns once you learn the basics. Every symbol represents a stitch, and after a little practice, crochet charts become one of the fastest and easiest ways to follow patterns.
In this beginner-friendly guide, you’ll learn the most common crochet symbols using US crochet terms, simple explanations, and easy tips to help you read crochet charts with confidence.
What Are Crochet Symbols?
Crochet symbols are small visual signs used in crochet diagrams and chart patterns. Instead of reading long written instructions, you follow symbols that show exactly where and how to place stitches.
Many crocheters love chart patterns because they:
-
Make complicated patterns easier to follow
-
Help visual learners understand stitches better
-
Work across different languages
-
Show stitch placement clearly
Beginner Tip:
Don’t try to memorize every symbol at once. Start with the basic stitches first, and the rest will become easier naturally.

Basic Crochet Symbols Every Beginner Should Know
1. Chain Stitch (ch)
Symbol:
Small oval shape
Used For:
Starting crochet projects and creating spaces between stitches.
Helpful Tip:
Try making your chains loose and even. Tight chains are one of the most common beginner frustrations because they make the first row difficult to crochet into.
2. Slip Stitch (sl st)
Symbol:
Small black dot
Used For:
Joining rounds, moving across stitches, and finishing projects neatly.
Beginner Warning:
Many beginners accidentally pull slip stitches too tightly. Keep them relaxed so your work stays flexible.
3. Single Crochet (sc)
Symbol:
Small plus sign (+)
Used For:
Creating tight, sturdy crochet fabric.
Helpful Tip:
Single crochet is commonly used in amigurumi, coasters, and beginner projects because it creates a dense texture with very few holes.
4. Half Double Crochet (hdc)
Symbol:
“T” shape with one small line
Used For:
Medium-height stitches that work up faster than single crochet.
Beginner Tip:
The most common mistake with half double crochet is forgetting the extra yarn over at the beginning of the stitch.
5. Double Crochet (dc)
Symbol:
Tall “T” with one slash
Used For:
Blankets, granny squares, shawls, and scarves.
Helpful Tip:
Double crochet is one of the best stitches for beginners because projects grow quickly and stitches are easier to see.
6. Treble Crochet (tr)
Symbol:
Tall “T” with two slashes
Used For:
Lace patterns and taller decorative stitches.
Beginner Warning:
Treble stitches can become uneven if your yarn tension changes too much. Try to keep your hands relaxed while crocheting.
Easy Special Stitch Symbols
V Stitch
Symbol:
V shape
Meaning:
Two stitches worked into the same space.
Helpful Tip:
V stitches create light and airy crochet fabric that works beautifully for shawls and summer projects.
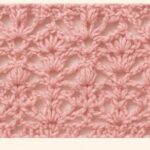
Shell Stitch
Symbol:
Fan shape
Meaning:
Several stitches worked into one stitch to create a shell design.
Beginner Tip:
Always count your stitches carefully in shell patterns because missing one stitch can change the entire shape.
Puff Stitch
Meaning:
Creates soft, raised texture.
Helpful Tip:
Puff stitches use more yarn than regular stitches, so keep extra yarn available for textured projects.
Bobble Stitch
Meaning:
Creates small raised crochet bumps for texture.
Beginner Warning:
Bobble stitches may look messy at first, but they usually look much better after blocking the finished project.
Front Post and Back Post Stitches
These stitches are worked around the post of the stitch instead of through the top loops.
Common post stitches include:
-
Front Post Double Crochet (FPdc)
-
Back Post Double Crochet (BPdc)
These stitches are often used for:
-
Ribbing
-
Hat brims
-
Texture patterns
-
Crochet cables
Helpful Tip:
Front and back post stitches can feel awkward in the beginning. Try practicing slowly on a small swatch before starting a large project.

Increase and Decrease Symbols
Increase (inc)
Meaning:
Make 2 stitches in the same stitch.
Used For:
Making crochet projects wider or rounder.
Beginner Tip:
Place a stitch marker in your first increase stitch to avoid losing count.


Decrease (sc2tog or dc2tog)
Meaning:
Join 2 stitches together.
Used For:
Shaping hats, sleeves, and amigurumi.
Helpful Tip:
Invisible decreases create a cleaner look, especially for amigurumi projects.

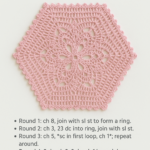
Magic Ring (mr)
Symbol:
Circle
Used For:
Starting granny squares, flowers, and amigurumi without leaving a hole in the center.
Beginner Warning:
Many beginners struggle with magic rings at first. If it feels difficult, practice with thicker yarn before using smaller yarn sizes.
How to Read Crochet Charts
For Row Patterns
Read:
-
Right to left
-
Then left to right on the next row
For Round Patterns
Start from the center and work outward in circles.
Helpful Tip:
Use a highlighter or removable marker to track rows while learning crochet charts.
Common Crochet Symbol Mistakes Beginners Make
1. Mixing Up Stitch Symbols
Many beginners confuse single crochet, half double crochet, and double crochet symbols because they look similar.
Fix:
Focus on the number of lines across the symbol:
-
No line = single crochet
-
One line = half double crochet or double crochet
-
Two lines = treble crochet
2. Forgetting Turning Chains
Turning chains count as stitches in many patterns.
Fix:
Always check the pattern notes to see whether turning chains count as stitches.
3. Reading Charts in the Wrong Direction
This is one of the biggest beginner mistakes.
Fix:
For flat rows:
-
Read right to left
-
Then left to right on the next row
For round charts:
-
Work from the center outward
4. Crocheting Too Tight
Tight tension makes stitches difficult to see and harder to work into.
Fix:
Relax your hands and avoid pulling the yarn too tightly after every stitch.
Beginner Crochet Tips From Personal Experience
When I first started learning crochet symbols, I kept stopping every few stitches to compare the chart with the actual stitches in my work. That simple habit helped me recognize symbols much faster.
Another thing that helped me was practicing with light-colored yarn. Dark yarn can make it difficult to see stitches clearly, especially when learning chart patterns.
A few more helpful beginner tips:
-
Start with granny squares before lace patterns
-
Use stitch markers often
-
Practice one stitch type at a time
-
Keep a crochet symbol chart nearby while learning
-
Don’t worry about speed — accuracy matters more at first
Creative Ideas to Practice Crochet Symbols
Once you learn basic crochet symbols, try practicing with:
-
Granny squares
-
Coasters
-
Simple flower motifs
-
Dishcloths
-
Small bookmarks
-
Baby blanket swatches
These small projects help beginners build confidence without feeling overwhelming.
Frequently Asked Questions
Are crochet symbols universal?
Yes, most crochet symbols are universal and can be understood worldwide, even when written languages are different.
Are crochet charts easier than written patterns?
For many crocheters, yes. Charts help visual learners understand stitch placement much faster than written instructions.
Which crochet stitch should beginners learn first?
Start with:
-
Chain stitch
-
Single crochet
-
Double crochet
-
Slip stitch
These stitches appear in most beginner patterns.
Why do my crochet charts look confusing?
Crochet charts can feel overwhelming at first because there are many symbols together. Start with simple patterns and focus on one symbol at a time.
Final Thoughts
Learning crochet symbols may feel confusing in the beginning, but once you understand the basics, crochet charts become much easier to follow than long written patterns.
Take your time, practice slowly, and don’t worry about mistakes. Every crocheter starts as a beginner, and with practice, reading crochet charts becomes second nature.
Happy Crocheting! 🧶