Looking for a lightweight, breathable crochet top that actually looks like something you’d wear outside—not just practice swatches?
This easy open fan crochet top pattern is perfect for beginners who want a lightweight and stylish summer top using simple stitches.
This open fan stitch top is one of those patterns that feels fancy but is surprisingly simple once you understand the repeat. I’ve broken everything down step-by-step, with small tips along the way so you don’t get stuck (or frustrated halfway through).
Whether you’re making your first wearable or just want a quick summer project, this pattern will guide you through it.

Materials
- Cotton yarn (DK or worsted weight recommended)
- 4–5 mm crochet hook
- Scissors
- Yarn needle
Optional:
- Stitch markers (very helpful if you’re new)
Gauge (Optional but Helpful)
4-inch swatch ≈ 16 double crochet stitches
Tip: Gauge isn’t critical here, but checking it can help your top fit better—especially if you crochet tightly.
Abbreviations
ch = chain
sc = single crochet
dc = double crochet
sp = space
sk = skip
st = stitch
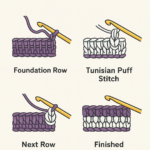
Stitch Pattern (Open Fan Stitch – Written)
🔹 Foundation
Chain a multiple of 8 + 3
Tip: If your starting chain feels tight, use a larger hook just for this row. A tight foundation will make the whole top stiff.

Row 1
- 1 dc in 4th chain from hook
- 1 dc in next 3 chains
- ch 1, skip 1
- Fan: 5 dc in next chain
- ch 1, skip 1
- 4 dc in next 4 stitches
Repeat across, turn
Tip: Double-check your stitch count after the first repeat. Fixing mistakes early saves a lot of time later.
Row 2
- ch 3 (counts as dc)
- 1 dc in next 3 stitches
- ch 1
- 5 dc in chain-1 space (fan)
- ch 1
- 4 dc in next 4 dc
Repeat across, turn
Tip: Always crochet fans into the chain space, not into stitches—this keeps the pattern open and aligned.
Repeat
Repeat Row 2 until desired height
Tip: Lay your work flat every few rows to make sure the fans line up neatly.
How to Turn This Into a Top
Panels
Make 2 identical panels (front and back)
Tip: Try to keep both panels the same tension so they match perfectly when joined.

Size Guide (Approx)
Small (S)
Width: 32–34 cm
Chains: ~66
Rows: 18–22
Medium (M)
Width: 36–38 cm
Chains: ~74
Rows: 20–24
Large (L)
Width: 40–44 cm
Chains: ~82
Rows: 22–26
Better tip: Measure your bust ÷ 2 and crochet panels to match that width instead of relying only on chain numbers.
Assembly
1. Join Sides
Join both panels using slip stitch or sewing
Leave armholes (18–22 cm)
Tip: Try it on (or measure) before fully closing the sides to ensure comfort.
2. Straps
- Attach yarn at front top corner
- Chain 25–40
- Work back with single crochet
- Attach to back panel
Tip: Don’t skip the single crochet row—plain chains stretch over time.
3. Edging
- Single crochet around neckline and armholes
- Optional: slip stitch round for a clean finish
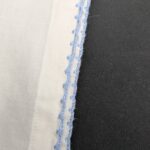
Tip: Even simple edging makes a big difference in the final look.
Inner Lining Idea
This stitch is open, so layering is important:
- Tube top
- Camisole
- Bralette
Or crochet a simple inner panel using single crochet rows.
Tip: Light neutral colors work best for a clean and wearable look.
Practical Tips (From Experience)
- Cotton yarn gives the best shape and prevents stretching
- Keep your tension relaxed—tight stitches will close the pattern
- Use stitch markers to track repeats if you’re unsure
- Don’t rush the first two rows—they control the whole pattern
- Block your finished panels to open up the design and improve shape
-
If your edges start curving, your tension may be uneven—slow down and adjust
⚠️ Common Mistakes (And How to Fix Them)
Fans look uneven or messy
This usually happens when fans are placed into stitches instead of chain spaces
Fix: Always crochet fans into the chain-1 space
Edges are not straight
You may be missing stitches at the start or end of rows
Fix: Count stitches regularly and check turning chains
Top looks too wide
You may have added too many stitches between fans
Fix: Stick to 4 double crochet stitches between each fan
Fabric feels stiff
Your tension may be too tight or yarn too thick
Fix: Use a larger hook or switch to softer cotton yarn
Straps stretch after wearing
Chain-only straps naturally stretch
Fix: Reinforce straps with single crochet or half double crochet
❓ FAQ
Is this pattern beginner-friendly?
Yes, if you know basic stitches like chain and double crochet, you can make this.How do I adjust the size?
Add or remove chains in multiples of 8. Measuring your body gives the best result.Can I use acrylic yarn?
Yes, but cotton yarn gives a more structured and breathable finish.How long does it take to make?
Usually 1–2 days depending on your speed and experience.Personal Experience
I’ve made this pattern more than once, and I expected it to be tricky—but after a few rows, it became a relaxing and enjoyable pattern.
Variations & Creative Ideas
- Add sleeves to turn it into a light sweater
- Extend the length to create a dress
- Use gradient yarn for a modern style
- Add scalloped edging for a softer look
-
Make it oversized for a relaxed fit
🔗 You May Also Like
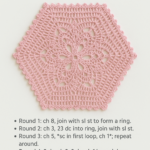
- Easy Crochet Flower Pattern (Step-by-Step Tutorial for Beginners)
- How to Crochet a Mesh Crop Top (Step-by-Step Guide + Sizing Guide)
- Beginner Crochet Lace Flower Top – Free Written Pattern
Final Thoughts
This open fan crochet top is a perfect balance of simple and stylish. Once you get comfortable with the pattern repeat, it becomes easy and enjoyable to work on.
Take your time, enjoy the process, and don’t worry about small mistakes—crochet is all about learning as you go.